 |
EnigmaIOT
0.9.8
Secure sensor and gateway platform based on ESP8266 and ESP32
|
|
EnigmaIOT
0.9.8
Secure sensor and gateway platform based on ESP8266 and ESP32
|
This document will serve as a guide to start working with EnigmaIOT, enabling you to develop your own secure sensor network easily, with a few additional lines of code compared with a regular Arduino program.
Any ESP32 or ESP8266 will do the job. Anyway, it is always recommended to use an ESP32 board because having much more RAM it will be more stable along time.
Notice that it is not possible to configure any node if you don't have a gateway working nearby.
You need to use a MQTT broker (or server). Any public or private will do the job. As EnigmaIOT is focused on privacy I advise to install your own MQTT private broker. You can do it on any home server or Raspberry Pi, or even in a virtual private server. Installing and configuring a broker is out of scope of this guide but there are plenty of good and easy guides online.
A good choice for a MQTT broker is Eclipse Mosquitto.
Don't forget to add a user and password to broker at least. EnigmaIOT supports MQTT brokers with TLS encryption. If you expose your broker to the public Internet adding TLS to your setup will improve privacy and security, so it is highly encouraged.
Using MQTT enables you to use a wide range or solutions to process, display information and manage your EnigmaIOT nodes. Good choices are Node-Red and Home Assistant, although you can use any software that is able to communicate with a MQTT broker, or any combination of them.
All examples have a platformio.ini file so that they can be compiled using PlatformIO without any additional requirement.
If you use Arduino IDE instead, you have to install all these libraries into your environment:
Code for gateway is included as an example on EnigmaIOT repository, as EnigmaIOTGatewayMQTT. You can find it here.
It may be used as it is. There is no need to modify it to be able to customize to your needs. Everything is done during first configuration.
You can use binary file included in release as an attachment or compile it by yourself.
You will need Espressif esptool utility to flash binary file on your ESP32 or ESP8266. If your system has Python and pip installed you can install esptool by running
Esptool will detect your board type and the port on which it is attached to so command line will be as simple as this:
It your MQTT broker uses TLS
If your MQTT broker does not use encrypted communication
If you have a ESP8266 (MQTT encryption is not supported)
First time you run EnigmaIOT gateway it will behave as a WiFi access point with name EnigmaIOTGateway. Connect your smartphone or computer to it.
A web browser should be open automatically pointing to configuration portal. If it is not the case you can access it opening http://192.168.4.1.
You should see something like this:
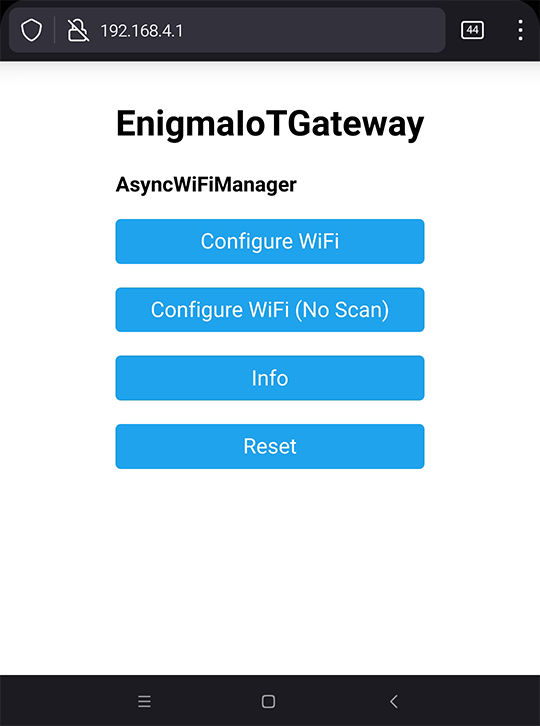
Click on Configure WiFi and board will scan networks. Select yours and continue filling all fields
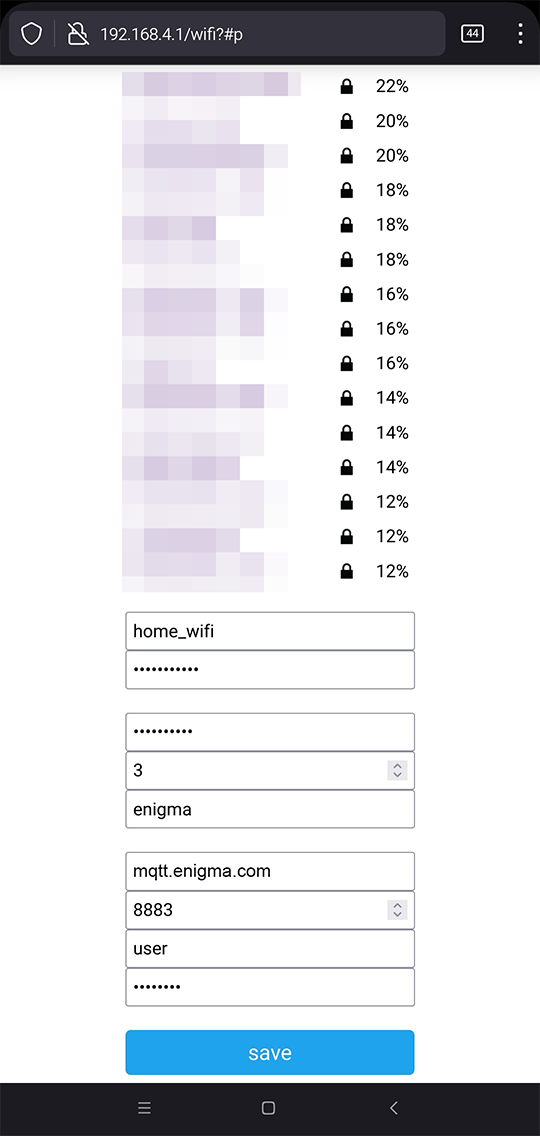
Fields explanation:
SSID: Name of your home WiFi network.
WiFi Password: Your home WiFi password.
Network Key: Network key for your EnigmaIOT network. All nodes and gateway must share this key. Choose a secure password and keep it safe.
Network Channel: EnigmaIOT gateway initial channel. This is not relevant for MQTT gateway as it will use the same as your WiFi network.
Network Name: EnigmaIOT network name. This identify your network. This name will be used as root for all MQTT messages to and from this gateway.
MQTT broker address: IP address or hostname where MQTT broker is listening on
TCP port: TCP port used by MQTT broker. 8883 is normally used by brokers with TLS encryption configured. 1883 is used otherwise.
MQTT username: Username configured on MQTT broker.
MQTT password: User password.
When you click save button and boards successfully connects to your WiFi network it reboots to start working as a real EnigmaIOT gateway.
Now you are ready to start your own EnigmaIOT network.
Although you can use gateway code as it is. There are some customizations available for experienced users.
LED_BUILTIN: On many ESP32 boards, built in LED is connected to Pin 5. On EnigmaIOTGatewayMQTT, LED is used to signal configuration mode (flashing LED) and to show activity from nodes. If your board uses a different pin you can set it here. You may use different LEDs to signal received or sent message, In that case you may set BLUE_LED and RED_LED.
If you use TLS to encrypt communication with MQTT broker, then you must provide the root certificate used to check server certificate. This varies between different certificate providers. Included certificate works with Let's encrypt. If you use a different provider or you have setup your own public key infrastructure you need to copy your CA certificate in PEM format assigned to DSTroot_CA variable.
You can use certificate decoder from SSLChecker.com to dump certificate data, as expiration date.
This file is on library code directory. There are some settings that you can tweak there before compilation. There are explanation for every parameter on file itself. Although it is safe to adjust these settings some combinations may lead your gateway to not be able to communicate with nodes. I do not recommend tweaking settings that you don't understand clearly.
NUM_NODES parameter is used to configure the maximum number of nodes. It is set to 35 by default that should be enough for most users. You may increase it if you expect your network to grow above this limit.
For ESP32 boards a limit of 100 or 200 nodes is safe, but ESP8266 may not have enough memory so if you find frequent reboots after setting this restore it to the default value.
EnigmaIOT is designed to hide all complexity behind, so that anyone that is barely familiar with Arduino environment is able to develop a node.
Simplest node code may be something like this.
If you use PlatformIO IDE you may use this platformio.ini
In the same way as we did with gateway, when node starts for first time it announces itself as a WiFi access point with name EnigmaIoTNode followed by chipID.
When you connect to this AP without password you get a web page like this:

Click on Configure WiFi button and you will get the list of WiFi networks around. It is important not to select your home WiFi network here. It is not what an EnigmaIOT node needs. You should select the one whose name is you EnigmaIOT network name. This comes from your EnigmaIOT gateway.
This AP needs a password it is the one that you configured as Network key in your gateway.
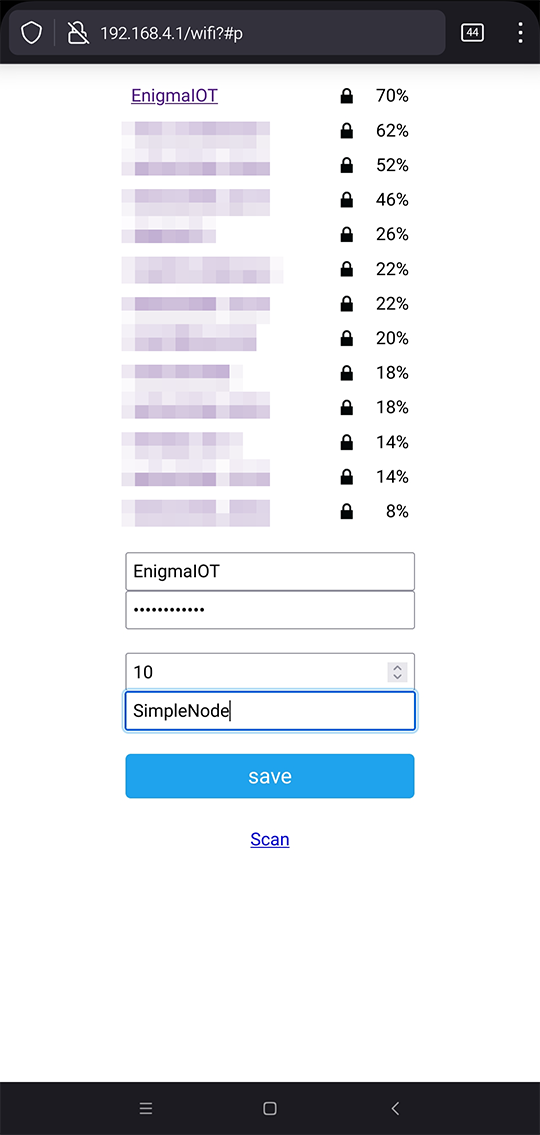
You need to fill this settings in:
SSID: Your network name (as configured in gateway)
Password: Your network key (as configured in gateway)
Sleep time: A node may be designed to sleep after sending a message. In that case this is the default sleep time in seconds. If your node does not go to sleep mode, then this setting is ignored.
Node Name: This is your node name. It must be unique in your network. It a gateway find a node with duplicate name this name will be ignored and will use its MAC address instead.
After information is saved, node checks that it can connect Gateway WiFi AP successfully. If so, it reboots and start sending data.
Using EnigmaIOTGatewayMQTT you will get a MQTT message every time your node sends data.
Topic format is always the same:
If you need to build a node you may start coding from scratch as it is shown before. Additionally you can use a Template so many features are already implemented transparently:
JSON Controller wraps EnigmaIOT node with additional features. It is implemented as a cpp and h files that contains setup () and loop () functions. You should use them instead main setup and loop.
First step I recommend is coding a simple sketch that deals with your hardware (sensors, actuators) as a regular Arduino program. To illustrate this I will use EnigmaIOT-Sensor-Controller example. It is a node that uses a DS18B20 temperature sensor that reads temperature value, sends it and then sleeps until next measurement.
So starting code could look like this
When this code has the functionality that you need and it is tested you can follow with integration on EnigmaIOT JSON Controller code.
To develop a new JSONController node you need to use JSONController template example as starting point.
I will follow the process to get to the point implemented in EnigmaIOT-Sensor-Controller.
You need to follow these steps:
It is recommended to rename cpp and h files so that its name is coherent with the function they have. Following this, BasicController.h/cpp will become ds18b20Controller.h/cpp. Then edit CONTROLLER_CLASS_NAME and CONTROLLER_NAME on ds18b20Controller.h like this:
and two first lines to:
If you want to design a node that is powered with batteries, then it should enter into deep sleep mode after sending its data. To do so you only need to set SLEEPY to 1 or true. You need to do so on main cpp file. In sensor controller example, it is EnigmaIOT-Sensor-Controller.ino.
It you don't need sleep function leave it as 0.
Notice that non sleepy nodes have an additional time synchronization function that is not available for nodes that enter deep sleep mode. This allows you to add features as timer or time synchronized tasks in different nodes.
You need to add all global variables defined in Arduino code as JSON Controller class parameters in ds18b20Controller.h.
If your code needs custom libraries you may add them on JSON controller header file (ds18b20Controller.h)
In the same way you should add custom functions like sendTemperature () as class methods. You need to define them in ds18b20Controller.h
If you like to integrate your node into HomeAssistant you may include the corresponding header file.
You need to choose the file to include according node function. As this will be a sensor node we should use haSensor.h. If your node uses different profiles you can include several HA integration header files. For instance, a smart metering plug is a sensor (Power measurement) and binary switch (ON-OFF).
Then you need to add configuration on cpp file. In sensor controller node example it is
All needed defines and constants that you need in your code may be added at the beginning of controller cpp file. You can add them to header file instead but it is a good practice to restrict its code visibility.
If you modified file and class names you will need to update include in cpp file
setup() and loop()code to class methodNow, you can start integrating your code into JSON controller class. You need to copy setup and loop code into corresponding methods in JSON controller class.
Notice that I've added enigmaIotNode->isRegistered() to send data only if node has already registered with Gateway and not losing messages.
Add every custom function you have used as method into the class. You already added definitions in header file before. Now add the implementation to cpp file
This creates a JSON object with all data you need and sends it to gateway using sendJson () method. Notice that EnigmaIOT uses esp-now protocol to communicate nodes with gateway. This implies a limit of 250 bytes per message, including headers. So, if you have problem receiving messages or you get partial data check the length of your payload.
There are a few of additional functions. Check other controller examples to learn how to use them.
Some kind of nodes as light controllers or smart switches should accept incoming messages to control different parameters. This can be achieved with processRxCommand and sendCommandResp.
It may be useful for a node to know if it is actually connected to gateway. To implement this you may fill these two methods: connectInform and disconnectInform.
Sometimes you need some data to be stored persistently on node sleeps or power cycles. There are a couple methods that may be implemented to achieve this: loadConfig and saveConfig.
You may want to add your own configuration fields to first configuration web portal on node. You can get this by implementing configManagerStart and configManagerExit.
There are some advanced settings on EnigmaIOTconfig.h. You may modify this data but it is important that you understand what every setting means. If you adjust them randomly you may get into instabilities or your node may be unable to communicate at all.